
Grocery Cart Drawing: A Complete Guide to Drawing the Perfect Grocery Cart
Whether you are an aspiring artist, a student working on a sketching project, or simply looking to improve your drawing skills, mastering a grocery cart drawing can be both fun and rewarding. This guide will walk you through the step-by-step process of drawing a grocery cart, share practical tips to enhance your sketch, and explore various styles and techniques that bring your grocery cart illustration to life.
Why Learn How to Draw a Grocery Cart?
A grocery cart is a commonplace object that offers a great opportunity to practice perspective, proportions, and detail drawing. Understanding how to draw this everyday item can improve your skills in sketching metal structures, shadows, reflections, and even help with drawing wheels and grids.
- Enhances your observation skills: Capturing the intricate design of a grocery cart requires focus and attention to detail.
- Improves perspective drawing: Grocery carts have multiple angles and parts, excellent for practicing 3D drawing techniques.
- Develops shading and texture skills: Learn to depict different materials like metal, plastic, and rubber.
Materials Needed for Grocery Cart Drawing
Before you start your grocery cart sketch, prepare the following materials to make your drawing process smooth and enjoyable:
- Graphite pencils (range from HB to 6B)
- Eraser (kneaded and precision tip)
- Ruler or straight edge
- Blending stump or cotton swabs for shading
- Quality sketch paper or drawing pad
- Optional: Colored pencils or markers for color accents
Step-by-Step Guide to Drawing a Grocery Cart
Follow these detailed steps to create an accurate and aesthetically pleasing grocery cart drawing:
Step 1: Outline the Basic Shape
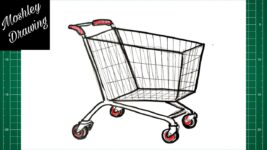
Start by drawing the overall shape of the grocery cart – usually a rectangular basket attached to a frame. Use light pencil strokes to sketch the cart’s silhouette, including the handle and base.
Step 2: Draw the Cart Frame and Grid
Add the inner grid pattern to represent the metal wire basket. Use vertical and horizontal lines, adjusting the grid pattern for perspective to give the cart a three-dimensional look.
Step 3: Sketch the Wheels
Draw the grocery cart’s wheels at the base. Pay attention to their circular shapes and placement. Add details like the wheel rims and axles.
Step 4: Add Handles and Smaller Details
Sketch the handlebar and connectors between the frame and basket. Don’t forget to illustrate the protective bumpers or plastic parts that often appear on carts.
Step 5: Refine and Add Depth with Shading
Start shading your grocery cart drawing. Shade the metallic parts with gradients to imply reflections and shadows. Use cross-hatching or smooth blending techniques to add realism.
Step 6: Final Touches and Coloring (Optional)
If desired, add colors using markers or colored pencils – for example, the plastic handlebar in red or blue to make your drawing vibrant.
Creative Styles for Grocery Cart Drawing
Experiment with different artistic styles when drawing grocery carts. Here are some popular approaches you can try:
- Realistic Style: Focus on accurate proportions, shading, and detailed textures.
- Minimalist Line Art: Use simple and clean lines to represent the cart without much detail.
- Cartoon or Comic Style: Exaggerate parts of the cart and add bold outlines and colors.
- Sketchy and Abstract: Use loose and spontaneous strokes for an impressionistic effect.
Benefits of Drawing Grocery Carts
| Benefit | Description |
|---|---|
| Improves Perspective Skills | Master angles and depth through complex cart shapes. |
| Develops Detailing Ability | Practice fine lines for the grid and cart components. |
| Teaches Material Textures | Learn to depict metal, rubber, and plastic realistically. |
| Boosts Creativity | Try out various styles and color schemes. |
| Enhances Patience and Focus | Drawing intricate objects requires careful attention. |
Practical Tips for Successful Grocery Cart Drawing
- Use Reference Images: Find photos of grocery carts from different angles for accuracy.
- Start Light: Always sketch lightly at first, so you can easily erase mistakes.
- Maintain the Perspective: Using a ruler helps keep lines straight and the drawing balanced.
- Focus on Proportions: Compare the width of the basket to the size of the wheels and handles carefully.
- Experiment with Shadows: Observe how light hits the cart and shade accordingly to add depth.
- Be Patient: Detailed drawings take time, so don’t rush the process.
Firsthand Experience: Drawing My Grocery Cart
When I first tried drawing a grocery cart, I was surprised by how challenging it was to get the grid perspective right. I started with a simple rectangle but realized that the cart’s angled sides and wheels required patience and precise measurements. By breaking down the cart into smaller parts – basket, wheels, handle – and focusing on shading carefully, the sketch gradually came to life. Adding a bit of color to the handle gave it a playful touch. This experience reinforced the importance of practice and observation when tackling everyday objects.
Conclusion
Learning how to create a grocery cart drawing can be a rewarding artistic journey that develops your technical skills and sparks creativity. With the right materials, patience, and practice, anyone can master drawing this iconic object. Whether you choose a realistic, minimalist, or playful style, your grocery cart sketch will grow more detailed and professional over time. Use the tips and step-by-step guide in this article to get started today and unlock new levels in your art skills!


